Set up a CSV
Set up a CSV
What's a CSV?
CSV stands for "comma separated values" and signifies a file type (.csv) widely understood by spreadsheets and database software.
In Volume Portrait Accounts 'CSV' refers to a .csv template that you will populate with all the information necessary to operate your account, including:
• each user's (client's) name and password
• the first and last image in which each individual features
• up to 10 "class photos" (group, team, classroom photos that you may want to offer to every user)
• "Room" (a way to sort images by class, team or other sub-group for the organising school or club etc)
• Relevant "sibling images" that you may want to offer to each user.
How to use the CSV template
We will supply you with a CSV template on request. Once you receive it, you can create copies and add all the relevant information.
The completed spreadsheet is uploaded to Workspace and used to sort your event into separate collections with individual passwords for each portrait session (using our auto create collections feature). Once they've logged in this will direct your clients to photos they appear in, as well as the "class" and "sibling" photos relevant to them.
Set up a CSV
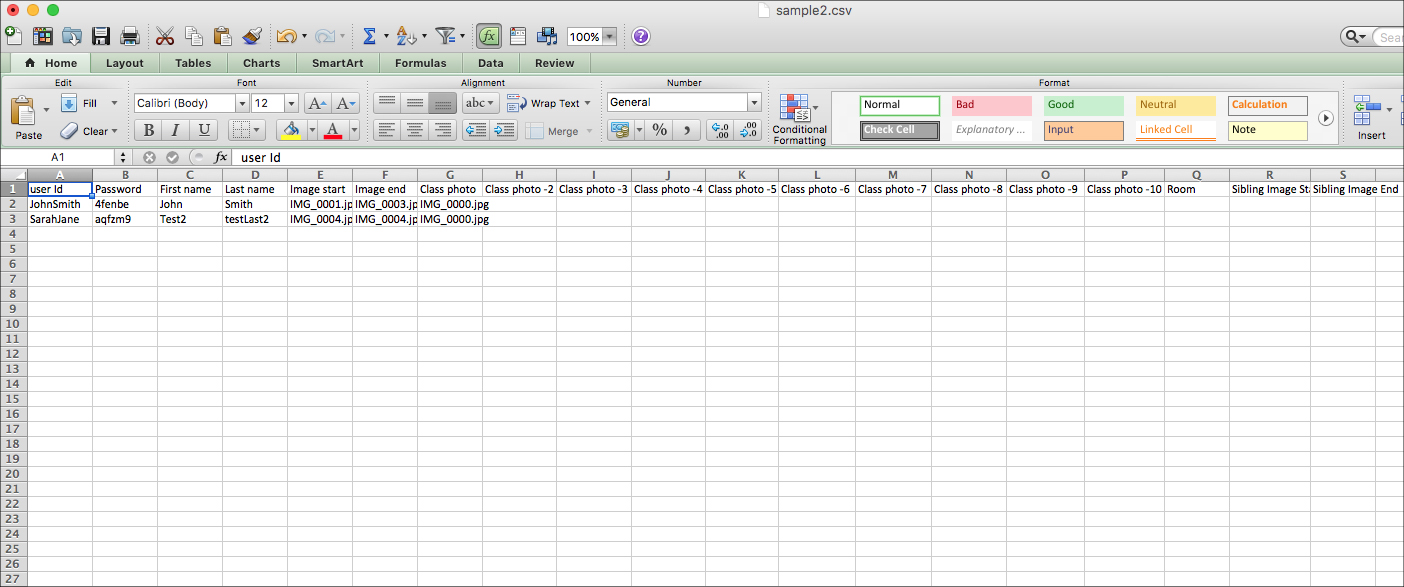
In the screenshot, you can see all of the fields you will need to fill out in order to sort your images into collections in Workspace.
Tips for filling out the CSV:
When filling out this form, every character used must be exact. If your filename is jessica001.jpg then it must be jessica001.jpg on your CSV or it will not work. The form is case sensitive.
If your filenames have spaces, Workspace will add an underscore where there is a space and the CSV will not work.
There are characters you cannot use when you're naming files as they will not work on a CSV. These are: !@#$%^&*()<> ?:”{}_+,./;’[]-=`~

loading...

What goes in each field?
User ID: This is the code they will use to login (along with password below) to view and purchase images.
Password: This is the password they will use to login (along with User ID above) to view and purchase images. You have have a software that autogenerates passwords, which makes this step very quick.
First name: First name of the student (also the name of the collection created in Workspace).
Last name: Last name of the student.
Image start: This is the file name of the first individual photograph the student appears in. The file name added here must be exactly the same as the original image file name eg. IMG_0001, with no spaces (Workspace automatically adds an underscore where a space appears in a file name, which will make the CSV not work).
Image end: This is the file name of the first individual photograph the student appears in. File naming rules apply as above.
Class photo: This is the file name of the class photo in which the student appears in. Multiple students will have the same file name in this column.
Class photo-2 etc: This field and the following Class photo columns are for any extra photos such as sports or music photos.
Room: Same as above.
Sibling image start: If the student has sibling photographs, the file name of the first sibling photograph this student appears in will need to be entered here. File naming rules apply as above.
Sibling image end: The file name of the last sibling photograph this student appears in will need to be entered here. File naming rules apply as above.
Once you've finished entering all of the details into the CSV, you're ready to set up your Event Defaults, so you can upload images to Workspace.


